Release/Renew IP address stands for a process that can assist to resolve network connectivity problems. It can be accomplished using the Command Line on Windows or System Preferences on Mac OS. Release and Renewing IP address implies reassigning the lease of the DHCP IP address of the host device and stating a request for a new IP address. そもそも, the ipconfig /release command is applied to reassign the current IP lease and transmit the server a DHCP alert to notify the old IP address as vacant. The second command – “ipconfig /renew” asks for a new IP address.
The aforesaid commands assist to solve network connectivity issues that occur due to expired IP addresses or other insignificant system malfunctions. It can assist in resolving IP-related troubles and recover a fully-functioning network connection immediately.
After the Release/Renew IP commands, the Flush DNS command normally follows, which cleans the DNS cache and submits requests to apply new IP address details.
Follow the tutorial below to release and renew IP addresses on Windows 11/10/7, マック, and Linux devices. Ensure your network adapter is properly set to Obtain an IP address automatically. さもないと, the aforesaid commands won’t function as they should.
How to Release and Renew IP Address on Windows, マック, Linux
ウィンドウズ 11/10/8
To release and renew IP address on Windows 10, 8.1 また 8, implement the milestones provided below.- In Windows 11/10/8, apply Windows search to locate コマンド・プロンプト.
- 右クリック の上 コマンド・プロンプト そして選択してください 管理者として実行 指示.
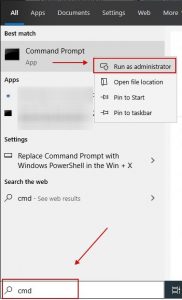
- で ユーザーアカウント制御 窓, 選ぶ はい.
- で CMD, 特定 ipconfig /release そして殴る 入力.
- その後, 特定 ipconfig /renew そして殴る 入力.
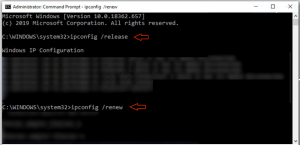
- Take time until the DHCP server sets a new IP address for your device.
ウィンドウズ 7 and Vista
Refer to these milestones to apply ipconfig /release and ipconfig/renew commands on ウィンドウズ 7 or Vista.
- に行く Windows menu, afterwards specify cmd in Windows search field.
- 右クリック on the コマンド・プロンプト area and select 管理者として実行 in the menu.
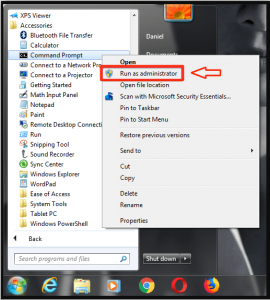
- で User Account Window, 選択する はい.
- この時点で, type the following command in the Command Prompt: ipconfig /release そして殴る 入力.
- 特定 ipconfig /renew そして殴る 入力.
Mac OS
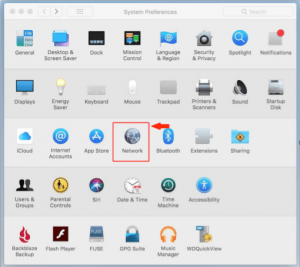
- Go to the りんご logo in the upper-left area of the screen and choose システム環境設定.
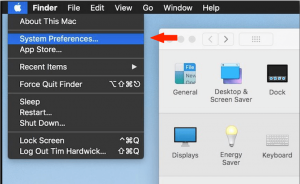
- この時点で, に進む 通信網.
- In the left area, 選ぶ Wi-Fi また Ethernet (based on which one you’re applying). Afterwards select Advanced… button on the right area of the 通信網 メニュー.
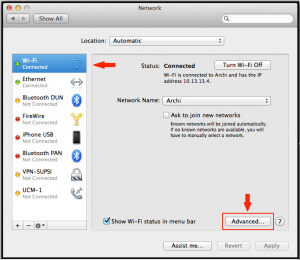
- 選ぶ TCP/IP tab. この時点で, you may notice that Configure IPv4 is tuned to Using DHCP. 選択する Renew DHCP Lease ボタン.
- Take time until you notice a change in IPv4 address. The process is fully accomplished.
Linux/Ubuntu
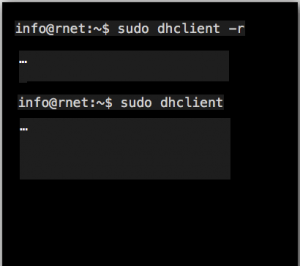
The tutorial below gives an identical example of ipconfig /release and ipconfig /renew commands on Linux. Follow these milestones to encourage DHCP Client to Renew IP Address.- Use the CTRL+ALT+T hotkey to open Terminal on Linux.
- In Terminal, 特定 sudo dhclient – r そして殴る 入力 to vacate the present IP.
- その後, 特定 sudo dhclient そして殴る 入力 to obtain a new IP address via DHCP server.
Useful DNS Resolver Commands for Windows
Apart from the Renew and Release IP commands, you might have to or require to apply some of the commands mentioned below.
- ipconfig /flushdns. Such command assist in clearing the DNS Resolver cache to make sure that the new IP data is fetched immediately.
- ipconfig /registerdns. Such a command refreshes all available DHCP leases and registers DNS names from the beginning.
- ipconfig /displaydns. Indicates available contents located in DNS Resolver Cache.
Fix IPconfig release renew not working
IPConfig /Release and /Renew commands function only if your network adapter is tuned to call out the IP address automatically. To say it otherwise, you ought to have DHCP activated. You can set these parameters by means of Windows Network and Sharing Center.
- に進む ネットワークと共有センター, その後選択します Change adapter settings.
- 右クリック your network adapter and start プロパティ.
- Locate Internet Protocol Version 4 ( TCP /IPv4) そして選択してください プロパティ.
- 選ぶ Obtain IP Address automatically そして選択します OK to apply changes.
コメントを残す