“Since installing the Meltdown patch for Windows 10, my Ryzen system has BSOD’d several times with WHEA UNCORRECTABLE ERROR and KERNEL SECURITY CHECK FAILURE messages”, — writes Twitter user @BradChacos.
Customers who experience this issue normally claim that they have lately updated Windows or upgraded their RAM, or switched on USB tethering. It was also noted that many customers on Reddit speak of Kernel Security Check Failure overclock side effect. The error alert normally reads:
Stop Code: KERNEL_SECURITY_CHECK_FAILURE
Possible reasons for the Kernel Security Check Failure issue:
- Outdated drivers (the most typical factor);
- Random Access Memory (RAM) troubles;
- Getting infected by malware;
- Corruption to Windows OS files;
- Antivirus program;
- Hard disk failure.
Each time you start your PC, Windows OS verifies whether the system is trouble-free and suitable to operate in a proper manner. Whenever it identifies troubles in crucial data areas, it shows the BSoD with Your PC ran into a problem and needs to restart alerta.
The good news is you can repair the Kernel Security Check Failure issue on your own. Just follow the guidelines set forth below. You might have to undertake several measures until you come up with the one that functions for your specific case.
Keep in mind that many guidelines on the web will instruct you to go to Windows Settings or click on the Windows Start button, cu toate acestea, in certain instances, customers go into a reboot loop and can’t even use these options. Be patient – these instructions explain all the step-by-step examples.
Access Windows system or make sure it does not restart automatically
eun some instances, customers who experience Kernel_Security_Check_Failure issue cannot implement any of the milestones to resolve it because the operating system literally crashes and reloads in a loop. In this situation, you have to implement two milestones before referring to any other solutions:- Reload your PC in Safe Mode with Networking. Inspect our tutorial dedicated to that or just keep hiting F8 as your PC loads and select Modul sigur in navigare pe internet in the Opțiuni avansate de pornire section.
- Preventing Windows from restarting automatically. You may find out how to do that in this guide. Another recommendation is to be quick considering the fact that you ought to repair the bug before Windows makes the decision to restart automatically once again. You might have to do it a couple of times before the goal is achieved.
Upon completing these milestones, be sure you boot back into common mode. To do so, lovit Windows key+R, specifica msconfig și lovit introduce.
Afterwards proceed to the Boot tab and uncheck Safe Boot. Selectați aplica și Bine.
Soluţie 1. Updating drivers with the help of a Device Manager
You do not require any exclusive paid driver updater application to repair and update drivers on your PC to repair BSoD Kernel_Security_Check_Failure (139).Important. Certain tutorials might recommend using Driver Verifier to detect out-of-date drivers – but we DEFINITELY urge you not to refer to their assistance, since this can cause even more BSoD issues. That instrument is elaborated for developers and advanced stress-testing, and common PC users need to stay away from it.
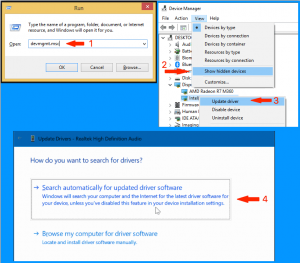
- Lovit Tasta Windows + R si specifica devmgmt.msc into the Alerga prompt. Lovit introduce. This starts Device Manager, which we’ll apply to update the out-of-date drivers.
- In Device Manager, alege View > Show hidden devices.
- În acest moment, check each category by clicking on the small arrow related to device categories. Right-click on drivers and select Update driver.
- Selectați Search automatically for updated driver application. Refer to subsequent guidelines on your PC and install driver updates available for you.
In addition to this milestone, we also suggest installing the fresh Windows updates. To make it possible, follow the next milestones.
Soluţie 2. Installing Windows updates
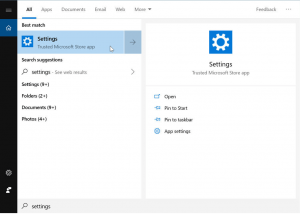
- In Windows search, specifica setări and select the matching result.
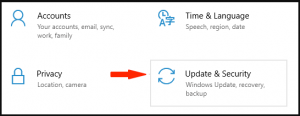
- Continuați la Actualizați & Security area.
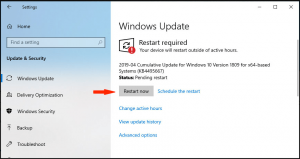
- În acest moment, Selectați Check for Updates și lovit Reporniți acum to install the fresh Windows updates.
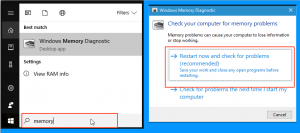
Soluţie 3. Try the Windows Memory Diagnostic app
Windows Memory Diagnostic stands for a software that can assist you in identifying RAM-related problems and fix Kernel Security Check Failure BootCamp.- Apply Windows search to locate Windows Memory Diagnostic.
- Lovit Restart Now and check for problems (recommended).
- Take time until the PC reloads to find out the test details. If they don’t automatically come up on the screen, right-click Windows icon on the system tray and launch Event Viewer.
- Continuați la Windows Logs > System. In the right area, Selectați Find and type memorydiagnostic. Choose the matching event and check the detailed information.
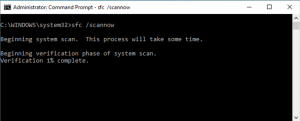
Soluţie 4. Launch system scan
- Start Command Prompt with Administrator’s privileges: specifica cmd în căutarea Windows, right-click on Command Prompt și selectați Run as Administrator. Clic da in the next window.
- În acest moment, specify the below-mentioned command: sfc /scannow și lovit introduce.
- Reload your PC and verify whether Kernel_Security_Check_Failure issue still occurs.
Soluţie 5. Scan Disk for Errors and repair them
- Specifica CMD în căutarea Windows, right-click the appropriate result and select Run as Administrator. În UAC screen, Selectați da.
- In Command Prompt, enter the below-said line:
chkdsk C: /f /r
This command locates and repairs detected errors on disk, established bad sectors and recovers malign data.
You may encounter an error indicating that the disk is currently in use. Just Type Y și lovit introduce; this reappoints the scan and launches it after the next PC reload.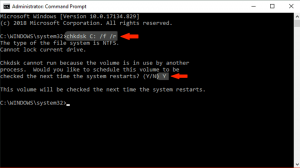
Soluţie 6. Repair by means of the Advanced Boot Options
You may fix Kernel Security Check Failure on Windows 10 sau 8 with the assistance of Advanced Boot Options. To get to the Advanced Boot Options, lovit Schimb key while you select to Repornire your PC from Windows menu. Another solution to enter the Advanced Boot Option menu is to begin hitting F12 key on your keyboard while the boot takes place. As soon as you are in the Advanced Boot Option menu, implement these milestones:- Selectați Depanați > Advanced Options.
- Click pe Startup Repair.
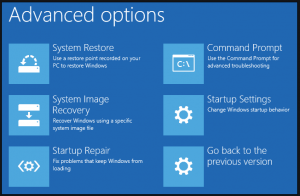
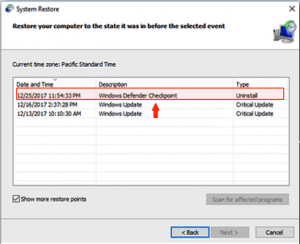
Soluţie 7. Apply a restore point to promptly resolve Kernel Security Check Failure
eun case you made a restore point manually or if your PC is tuned to form them on a regular basis, you may use this priviledge and recover your device to the condition prior the Kernel Security Check Failure issue.- Load into Opțiuni avansate de pornire as set forth in the Solution 6;
- Continuați la Depanați > Advanced Options > System Restore;
- Select a restore point formed before the error alert initially started taking place and follow all subsequent guidelines on screen.
Soluţie 8. Repair Kernel Security Check Failure BootCamp
The problem can disturb Mac customers, too. People have previously mentioned encountering this issue while running Windows on Mac device via BootCamp. The below-given solution has assisted many customers in fixing Kernel Security Check Failure BootCamp:- In the first place, delete the current Windows installation by means of the BootCamp Assistant.
- Perform the reset of System Management Controller (SMC) and Nonvolatile Random-Access Memory.
- Peform the fresh installation of Windows 10.
- Inspect whether the issue still occurs.
In case you came up with another idea to the Kernel Security Check Failed on the PCs running Windows 10, please feel free to share it in the comments area with other users.
Lasa un comentariu