Flush DNS can assist you in resolving various DNS-related issues
Flush DNS command assists in clearing out-of-date or corrupted DNS resolver cache. As your PC automatically caches IPs and other DNS results to initiate further requests to a similar hostname in a more rapid way, it might also cache certain old or malicious data. Como resultado, you might not be able to get in touch with hosts properly. En realidad, it is one of the best solution to fix INET_E_RESOURCE_NOT_FOUND issue.
No matter what Windows version or browser you prefer, you can manually boost the process and clear DNS Cache using the simple milestones reviewed below. To simplify the navigation, refer to the Table of Contents to jump to the tutorial for your OS version.
The following guidelines explain how to flush DNS depending on the OS:
- ventanas 11/10/8/7;
- MacOS versions from 10.6 (Snow Leopard) a 10.15 (Catalina);
- linux;
- ubuntu;
- Cromo.
Instructions to Flush DNS Cache on Microsoft Windows
ventanas 11/10
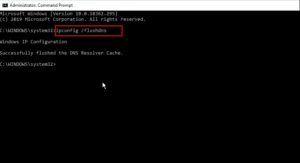
Flush DNS on Windows 11/10 is an easy command that must be provided in Windows Command Processor, also known as Command Prompt (CMD). You need to, sin embargo, open CMD with Administrator’s rights. This is what you should do.
- In Windows 10, refer to Windows search and specify Símbolo del sistema.
- Right-click Command Prompt y seleccione Ejecutar como administrador.
- En Control de cuentas del usuario alerta, seleccionar Sí.
- En CMD, provide ipconfig /flushdns y golpear Ingresar.
ventanas 8
For flushing DNS on Windows 8 o 8.1, apply Command Prompt with Admin’s rights. Refer to these milestones to clear your DNS cache.
- In Windows 8/8.1, refer to Windows search and indicate Símbolo del sistema.
- Right-click Command Prompt y seleccione Ejecutar como administrador.
- En Control de cuentas del usuario alerta, elegir Sí.
- En CMD, especificar ipconfig /flushdns y golpear Ingresar.
ventanas 7
For flushing DNS cache on Windows 7, you should open Command Prompt as Administrator. Here’s the tutorial explaining how to do it.
- Haga clic en Comenzar > All Programs > Accessories and find Símbolo del sistema.
- Botón derecho del ratón Símbolo del sistema y elige Ejecutar como administrador.
- In CMD, tipo ipconfig /flushdns y presione Ingresar.
Windows XP / 2000 / NT / 98
If you’re searching on how to clear DNS cache on previous Windows versions, look no further. All you should do is:
- Ir a Comenzar > Correr >
cmd.exe> DE ACUERDO. - Especificar ipconfig /flushdns y golpear Ingresar.
Instructions to Flush DNS Cache on Mac OS
To clear DNS Cache on Mac OS X systems, follow the tutorial provided below. Please pay attention to the commands given for various Mac OS versions – not all of them are identical for every OS.
MacOS 10.15: Catalina
To flush DNS on MacOS Catalina, implement these milestones.
- Start Terminal (Application › Utilities › Terminal or provide Go > Utilities > Terminal)
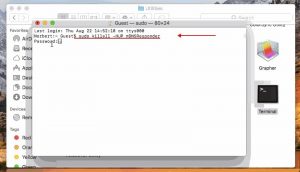
- Especificar sudo killall -HUP mDNSResponder y golpear Ingresar to launch the command.
- Provide your password (it might not come up on the screen while you type).
- Golpear Ingresar. Shut down the Terminal.
MacOS 10.14: Mojave
Clearing DNS on MacOS Mojave is a fast and simple process if you refer to these milestones.
- Start Terminal (Application › Utilities › Terminal or click Go > Utilities > Terminal).
- Especificar sudo killall -HUP mDNSResponder y golpear Ingresar to execute the command.
- Provide your password (it might not come up on the screen while you type).
- Golpear Ingresar. Shut down the Terminal.
MacOS 10.13: High Sierra
Flushing DNS on MacOS High Sierra can be implemented by referring to these milestones.
- Launch Terminal (Application › Utilities › Terminal or click Go > Utilities > Terminal).
- Especificar sudo killall -HUP mDNSResponder y golpear Ingresar to launch the command.
- Provide your password (it might not come up on the screen while you type).
- Golpear Ingresar. Shut down the Terminal.
MacOS 10.12: Sierra
If you would like to flush DNS on MacOS Sierra, refer to these milestones.
- Launch Terminal (Application › Utilities › Terminal or click Go > Utilities > Terminal).
- Especificar sudo killall -HUP mDNSResponder y golpear Ingresar to launch the command.
- Provide your password (it might not come up on the screen while you type).
- Golpear Ingresar. Shut down the Terminal.
 This command flushes DNS cache in the majority of Mac OS X systems except Yosemite, Lion and previous versions.
Mac OS X 10.10: Yosemite
For the purpose of flushing DNS on MacOS X Yosemite, perform these milestones.
- Launch Terminal (Application › Utilities › Terminal or choose Go > Utilities > Terminal).
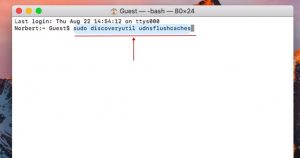
- Especificar sudo discoveryutil udnsflushcaches y golpear Ingresar to execute the command.
- Provide your password (it might not come up on the screen while you type).
- Golpear Ingresar. Shut down the Terminal.
Clearing DNS Cache on Linux or Ubuntu
linux
- Start Terminal by applying the Control + alternativa + T dominio.
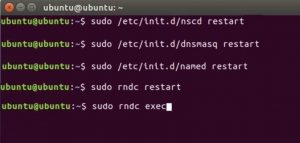
- Linux suggests different commands for DNS flushing. Please find them below:
- For the purpose of clearing nscd DNS cache: sudo /etc/init.d/nscd restart;
- For the purpose of clearing dnsmasq DNS cache: sudo /etc/init.d/dnsmasq restart;
- For the purpose of clearing BIND DNS cache, apply one of the below-mentioned commands:
- sudo /etc/init.d/named restart;
- sudo rndc restart;
- sudo rndc exec.
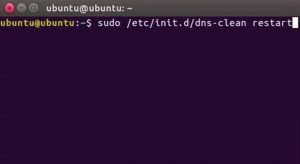
ubuntu
- Start Terminal by means of the Control + alternativa + T hotkey.
- Provide the following command: sudo /etc/init.d/dns-clean restart y golpear Ingresar.
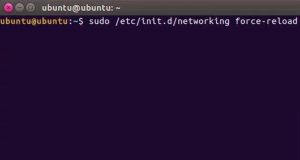
- En este punto, especificar sudo /etc/init.d/networking force-reload y presione Ingresar.
Flushing DNS on Google Chrome
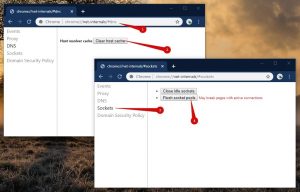
Google Chrome browser is furnished with an in-built caching system. To clear the DNS cache from Chrome, perform these milestones.
- Start Chrome browser. Copy and paste the below-said information into the Chrome address bar, then hit Ingresar.chrome://net-internals/#dns
- Elegir Clear host cache.
- Then click on Sockets.
- Hacer clic Flush socket pools.
If you want to clear the DNS cache on browsers, such as Firefox or Safari, we offer to reset them.
All done! We are happy if our guide on how to flush DNS on Windows, Mac, linux, ubuntu, or Chrome was beneficial to you in fixing the issue.
Deja un comentario